- CSPro Getting Started Guide
- Introduction
- Installation
- CSPro Tutorial
- About the Tutorial
- Exercise 1: Create a Data Entry Application
- Exercise 2: Create the Data Dictionary
- Exercise 3: Create the Data Entry Forms
- Exercise 4: Enter Data
- Exercise 5: Tabulate Data
- Exercise 6: Modify the Table
- Exercise 7: Add Edits to the Data Entry Application
- Exercise 8: Run a Batch Application
Step 2: Add Text and Boxes
(Exercise 3, Create the Data Entry Forms)
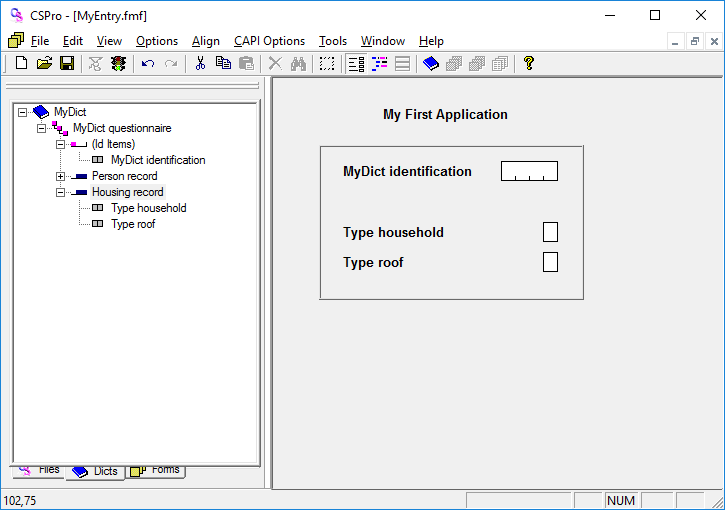
First, we will add our own line of text at the top of the screen.
- Right-click on the form, somewhere above MyDict identification.
- Select Add Text from the menu.
- Type My First Application and then Enter (or click on OK).
- Adjust the position of the text until it is just where you want it. To do this, select the text (click on it) and use the arrow keys, or drag and drop the text to the new location.
Next we will draw a box around the data entry fields.
- Click
 on the toolbar. A small toolbar will appear floating over the screen.
 - Click on the box second to the right of the floating toolbar.
- Position the mouse pointer above and to the left of MyDict identification.
- Left-click and hold the button down.
- Drag the mouse toward the right and down.
- When the box looks the way you want it, release the mouse button.
- Click again on the toolbar to close the floating toolbar.
When you have completed this step the screen should look something like:
Continue to the next step: Step 3: Generate Forms Automatically.